Loading manual…
GE JTP48BFBB user manual
- Type
- User manual
- Language
- English
- Pages
- 16
- Category
- Ovens & ranges
- Models
- JT912JT912CFCCJT912SKSSJT912WFWWJT915JT915SKSSJT952JT952WFWWJT955JT955BFBBJTP20JTP20BFBBJTP20SFSSJTP25JTP28JTP28SFSSJTP28SKSSJTP48JTP48BFBBJTP48SFSSJTP50ZET938
Open PDFOpens the file on images.salsify.com.
Contents
- Before You Beginp. 1
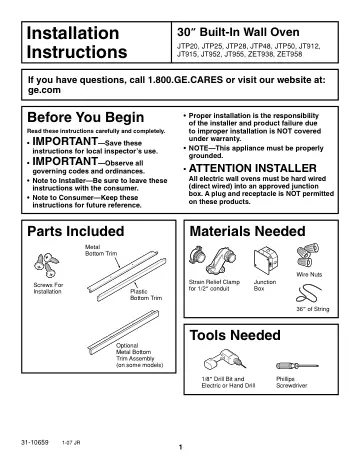
Read these instructions carefully and completely. • IMPORTANT—Save these instructions for local inspector’s use. • IMPORTANT—Observe all governing codes and…
- Parts Includedp. 1
Screws For Installation Metal Bottom Trim Plastic Bottom Trim Optional Metal Bottom Trim Assembly (on some models)
- Materials Neededp. 1
Strain Relief Clamp for 1/2” conduit Junction Box Wire Nuts 36” of String 31-10659 1-07 JR Parts Included Screws For Installation Metal Bottom Trim Plastic…
- Tools Neededp. 1
1/8” Drill Bit and Electric or Hand Drill Phillips Screwdriver Materials Needed Strain Relief Clamp for 1/2” conduit Junction Box Wire Nuts 36” of String…
- IMPORTANT SAFETY INSTRUCTIONSp. 2
Installation Instructions For Your Safety • Be sure your oven is installed properly by a qualified installer or service technician. • Be sure the oven is…
- Pre-Installation Checklistp. 3
- Cutout for Single Built-In Ovenp. 5
NOTE: If the cabinet does not have a front frame and the sides are less than 3/4” thick, shim both sides equally to establish the cutout width. A1 CL SUITABLE…
- Cutout for Double Built-In Ovenp. 6
- Cutout for Single Built-In Oven Under Counterp. 7
NOTE: This oven is not approved to be installed under a solid disk, induction or downdraft modular cooktop. A3 25" Gas or electric cooktops may be installed…
- Electrical Connectionsp. 8
ATTENTION INSTALLER All electric wall ovens must be hard wired (direct wired) into an approved junction box. A plug and receptacle is NOT permitted on these…
- Securing the Oven in the Openingp. 10
Drilling the Pilot Holes and Mounting the Oven a. Drill through the mounting holes (top and bottom) of the side trim, for the #8 screws provided. b. Secure the…
- Replacing the Oven Doorp. 12
D NOTE: The oven door is heavy. You may need help lifting the door high enough to slide it into the hinge slots. Do not lift the door by the handle. D1 D2 D3…
- Pre-Test Checklistp. 13
Check that the bottom trim is installed properly (see page 11). Check to be sure the mounting screws are installed and flush with the side trim (see page 10).…
- Operation Checklistp. 13
NOTE TO ELECTRICIAN: The power leads supplied with this appliance are UL recognized for connections to larger gauge household wiring. The insulation of these…
Other documents for this model
- GE JTP48BFBB user manual
- GE JTP48BFBB installation instructions
- GE JK915WFWW user manual
- GE JT952BFBB user manual
- GE JT952BFBB installation instructions
- GE JT952BFBB installation instructions
- GE JTP20CFCC installation instructions
- GE JT912BFBB installation instructions
- GE JT912BFBB installation instructions
- GE JTP28WFWW installation instructions